Automating Jekyll Deployments with GitHub Actions
![]()
In the last post I announced the move over to Jekyll. This post will discuss the steps taken to automate the deployments when changes and new posts are added to the site.
The Manual Process
In the manual process the following steps would be required each time I wanted to deploy a change (or new post) to the live site. These steps occur after the change has been made, tested locally and pushed to the version control Master branch.
- Build the site with JEKYLL_ENVIRONMENT=production bundle exec jekyll build.
- Login to the webserver with FTP & navigate to the site’s folder.
- Replace the existing contents with the built assets from step 1.
These steps are simple and easy. They are also boring, not always possible (if the machine doesn’t have Jekyll installed for example) and error prone since they are manual steps.
The Automated Solution
The steps of the manual process are a perfect candidate for automation as they are repetitive and can be done without a human. The automated solution uses GitHub Actions to run the steps. The ‘Action File’ can be seen below and is ran every time a commit to the Master branch is made.
name: Build & Upload Site

on:
  push:
    branches: [ master ]

jobs:
  build:
    runs-on: ubuntu-latest

    steps:
    - uses: actions/checkout@v2
    - uses: actions/setup-ruby@v1
      with:
        ruby-version: '2.7'

    - name: Setup Environment.
      run: |
        gem install jekyll bundler
        bundle install
        sudo apt-get install -y ncftp

    - name: Build Site with Jekyll.
      run: JEKYLL_ENV=production bundle exec jekyll build

    - name: Upload site to FTP.
      env:
        ftp_location: ${{ secrets.ftp_location }}
        ftp_username: ${{ secrets.ftp_username }}
        ftp_password: ${{ secrets.ftp_password }}
      run: |
        ncftpput -R -v -u "$ftp_username" -p "$ftp_password" $ftp_location /mikeconroy.com _site/*
The file essentially has some setup steps to ensure the Docker container has the required tools installed and then follows the steps from the manual process of building the site and uploading it to the FTP site. The full breakdown of the steps in this file can be seen below.
Why GitHub Actions?
When I first approached this task I was going to use Travis CI as that is a tool I have used before. However, I then remember GitHub Actions was released and since the code was in GitHub anyway I decided it would be more convenient to have the CD process in the same place as the repository.
Ultimately, the tool of choice doesn’t matter and many can be used to achieve the same goal. If I required a more complex pipeline of jobs/tasks to run then I would have put more consideration into the choice. This job could be easily & quickly replicated to any CI/CD tool.
Keeping Secrets… Secret
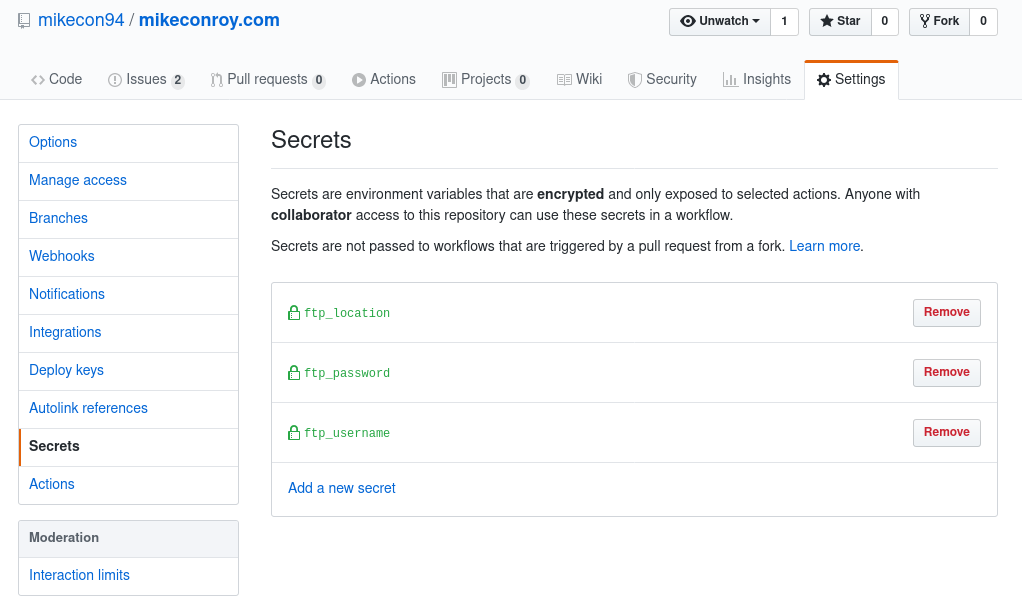
You may notice that the public Actions file requires the credentials to my FTP server. Thankfully GitHub has a solution for hiding these called Secrets.
In the Settings of the Repository there is an option called Secrets where these credentials can be set and then accessed via the env configuration as seen in the file. Once a Secret has been set it is not possible for anyone else to read them. The only options are to remove and create secrets. This means other users can be given access to the repository without them being able to read credentials.
Future Enhancements
Right now the automated steps are very simple but already providing me great value and saving time. In future I may consider adding some steps to the automation that do some basic testing of the site once built. This would help prevent any ‘broken’ commits making it onto the live site. One of the options I may look into is HTMLProofer which is a tool that runs various checks against the HTML such as ensuring image references exist, alt tags exist and internal links are working etc.
A Breakdown of the Actions File
The YAML file defining the Actions works as follows.
First we provide the name of the Workflow which is how it will appear when it runs in the Actions tab of the Repository.
name: Build & Upload SiteNext we specify when we want the build to run. In this case it is every time there is a push to the master branch. An alternative would be to do the build on a schedule. This may be more appropriate if there are many commits and you want to have a nightly build for example.
on:
  push:
    branches: [ master ]
Next we define the ‘jobs’. A workflow is made up of one or more jobs which can run in parallel or sequentially. In our use case we only have a single job to run which we have named ‘build’ which will encompass all the steps. Jobs can run on different types of machine. I don’t have any strict requirements so stuck with the default of ‘ubuntu-latest’.
jobs:
  build:
    runs-on: ubuntu-latest
We then begin to specify the ‘steps’ the action should take which are the sequence of tasks (commands) the worker needs to follow to complete the job. Here we define any existing actions that we want to use (there is a marketplace of ready made actions available for use). The checkout@v2 action is in the file by default and tells the worker to pull down the files in the repository. The setup-ruby@v1 is a marketplace action I am using to ensure the worker has Ruby correctly installed on it (the worker does come with Ruby by default but for some reason I got an error when running Jekyll).
steps:
  - uses: actions/checkout@v2
  - uses: actions/setup-ruby@v1
    with:
      ruby-version: '2.7'
Our next step is more environment setup, ensuring Jekyll is installed and ncftp. As you can see we use ‘run’ which executes the Linux commands passed to it.
- name: Setup Environment.
  run: |
    gem install jekyll bundler
    bundle install
    sudo apt-get install -y ncftp
We then build the site.
- name: Build Site with Jekyll.
  run: JEKYLL_ENV=production bundle exec jekyll build
Lastly, we use ncftpput to upload the built site folder to the FTP server where the site is hosted. Note the use of ‘env’ to access the secrets and how they can be referenced in the run command as environment variables. Ncftp was used as it has the -R flag which uploads a directory and all sub-directories in a single command which the standard FTP client does not.
- name: Upload site to FTP.
  env:
    ftp_location: ${{ secrets.ftp_location }}
    ftp_username: ${{ secrets.ftp_username }}
    ftp_password: ${{ secrets.ftp_password }}
  run: |
    ncftpput -R -v -u "$ftp_username" -p "$ftp_password" $ftp_location /mikeconroy.com _site/*
Conclusion
So there you have it, this is how I have automated the deployments of the Jekyll site to the webserver. We have looked at what steps have been automated and walked through how it was done with the GitHub Actions file. If you have any questions on any of the mentioned technologies let me know in the comments below!